Running Board installation…
So after painting and drilling holes, I was ready to mount the new running boards, starting with the coupe. It didn't take long to find out I had a problem: there was too much rubber "lip" on the upper inside edge of the boards, preventing them from lying flat on the brackets. The solution was to trim the rubber lip down, but what's the best way to do that without screwing them up? Here's how I managed it.
First, I wanted to know how much extra rubber I had and therefore how much had to be trimmed off. Using my calipers, I measured an old running board that had no rubber left on it. That measurement (see photo) was 1 and 1/4 inches. Since there would have been no rubber on the bottom, only on the top, I figured an extra 1/4" on top would be adequate.

The lip on a new running board measured 2 and 1/16", so that left an inch of rubber between metal and core, meaning I'd need to trim 11/16" off the lip. Put another way, I wanted the final measurement to be 1 1/2" from the bottom of the board to top of the lip. I asked my bodyman, Jr. Locke, for a recommendation on how to best trim the excess. He suggested using a jigsaw with a fine blade to cut it down close to where I wanted it, then take off the remainder with a rasp. That's what I did and it worked great.
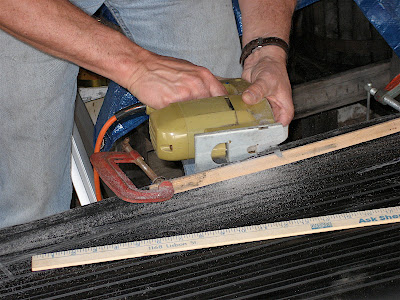
First, I clamped a thin piece of wood along the inner edge to act as a guide, measuring down a half inch from the top of the rubber.

Then, using a jigsaw with a 36 toothed (hacksaw) blade, I began sawing. It goes pretty quickly and I found myself staying slightly above the guide, "just in case." I then used the rasp to finish off the top cut. I'd set the calipers on 1.5 inches and used it to test for the proper dimension by sliding it along the edge, taking down any high spots.


Sure enough, once the excess is removed the board fit fine. Even the mounting holes lined up correctly!

It took me about an hour to do the first board, but only 15 minutes or so for the 4th. My greatest fear was going too deep into the rubber, but like everything else, measuring well is the key. So are the calipers - don't try this without them.
When I went to put the right hand board on the car, I discovered that it had too much rubber around the front corner, which prevented the front fender from sliding into place. That vertical edge needs to be cut back 1/4" or so and it is also a little high in that spot. I managed to file away enough rubber to make it fit properly, but if you ever do this, clean up that area beforehand. The LH board was fine, so I expect it is the nature of the RH mold and all such boards will have the same issue. If you match the two boards edge to edge you should see the difference. Trim to the smaller dimension.
Finally, use 1.25 x 5/16" bolts to attach the boards to the fenders. My holes lined up well once I used a Phillips screw driver as an alignment tool. Don't forget the anti-seize!
Finally, this rubber is very tough stuff. You don't have to baby it.
First, I wanted to know how much extra rubber I had and therefore how much had to be trimmed off. Using my calipers, I measured an old running board that had no rubber left on it. That measurement (see photo) was 1 and 1/4 inches. Since there would have been no rubber on the bottom, only on the top, I figured an extra 1/4" on top would be adequate.
The lip on a new running board measured 2 and 1/16", so that left an inch of rubber between metal and core, meaning I'd need to trim 11/16" off the lip. Put another way, I wanted the final measurement to be 1 1/2" from the bottom of the board to top of the lip. I asked my bodyman, Jr. Locke, for a recommendation on how to best trim the excess. He suggested using a jigsaw with a fine blade to cut it down close to where I wanted it, then take off the remainder with a rasp. That's what I did and it worked great.
First, I clamped a thin piece of wood along the inner edge to act as a guide, measuring down a half inch from the top of the rubber.
Then, using a jigsaw with a 36 toothed (hacksaw) blade, I began sawing. It goes pretty quickly and I found myself staying slightly above the guide, "just in case." I then used the rasp to finish off the top cut. I'd set the calipers on 1.5 inches and used it to test for the proper dimension by sliding it along the edge, taking down any high spots.
Sure enough, once the excess is removed the board fit fine. Even the mounting holes lined up correctly!
It took me about an hour to do the first board, but only 15 minutes or so for the 4th. My greatest fear was going too deep into the rubber, but like everything else, measuring well is the key. So are the calipers - don't try this without them.
When I went to put the right hand board on the car, I discovered that it had too much rubber around the front corner, which prevented the front fender from sliding into place. That vertical edge needs to be cut back 1/4" or so and it is also a little high in that spot. I managed to file away enough rubber to make it fit properly, but if you ever do this, clean up that area beforehand. The LH board was fine, so I expect it is the nature of the RH mold and all such boards will have the same issue. If you match the two boards edge to edge you should see the difference. Trim to the smaller dimension.
Finally, use 1.25 x 5/16" bolts to attach the boards to the fenders. My holes lined up well once I used a Phillips screw driver as an alignment tool. Don't forget the anti-seize!
Finally, this rubber is very tough stuff. You don't have to baby it.
posted by Bob Shafto at 4:48 PM
![]()
![]()


0 Comments:
Post a Comment
<< Home